Instagram

Showing posts with label party decor. Show all posts

Have you ever tried to make a balloon banner? You know, the fancy pinterest-perfect ones? This baby shark themed birthday party was the first time I tried to make one; key word tried. They are incredibly difficult to make. Even with a balloon arch decorating strip that provides a template to theoretically make the process easier, it's really hard and takes a long, long time. Needless to say, I think I will be ordering pre-made ones in the future.

I ordered an electric balloon pump to expedite the inflating process- blowing up over 100 balloons is a challenge in and of itself. Given the baby shark theme, I went with shades of blue and silver for the balloons and general decor. To add further variety to the balloon banner, we inflated the balloons in varying sizes.


We placed one of the balloon banners along a bannister. Below the banner, we added more balloons spelling the birthday kid's name and "shark" as found here. Lastly, we cut segments of foil curtains and added them to the staircase.


To make things easier, I purchased a baby shark themed decor pack online. This came with a good amount of things that we used mostly for the photo backdrop where the cake and pictures would be. I added a 12 month photo banner for a personal touch. The balloon banner was placed on top, along with fabric and foil curtains on a metal adjustable backdrop stand.


Totally worth staying up until 2 AM for (really, I'm not being sarcastic).

baby shark themed party

Tuesday, September 21, 2021


While the list of celebrations COVID-19 has ruined could go on and on (or, rather, the lack of proper public health measure implementation that could have meant things would be better by now), it's also meant finding new meaning in a lot of these experiences. Although it meant not being able to throw the baby shower I would have liked for family, it did give us an opportunity to make things more intimate in an unexpected way. A virtual baby shower does not sound as fun as an in-person one, but that doesn't mean it doesn't have to be. The cons are obvious, but the pros can mean more flexibility (more guests can make it virtually than in person) and less party-planning hoops to jump through. With more time to actually shower and celebrate the parents-to-be, a virtual baby shower can end up being a really warm and tender event. 

Don't believe me? I don't blame you. Read on.
 

For the invites, Paperless Post is the way to go- no-contact and endless options! The shower was donut themed, so I went for an invite with sprinkles. I tried to change things up and not go with the traditional pink color theme for baby girls, so the color scheme was pastel multicolor. Both families were instructed to wear pastel colors, while the parents-to-be wore pink. 

The three things you really need for a virtual baby shower are a backdrop for your virtual platform, said platform, and games. We used Zoom which proved to be more challenging than anticipated (coordinating a crowd is no easy feat and I now have even more respect for teachers), so I recommend familiarizing yourself with group functions on the platform before the event. The games should be ones that are easy to explain and relatively simple so that your guests can follow along and engage without getting confused or caught up in technical difficulties. The decor just needs to be a large backdrop for the virtual platform and for photos. You could really even just go with a green screen and use an image as your background if you're crunched for time and resources. We drove up to visit the parents-to-be for the weekend and hosted the virtual baby shower out of their apartment, so we decorated it.


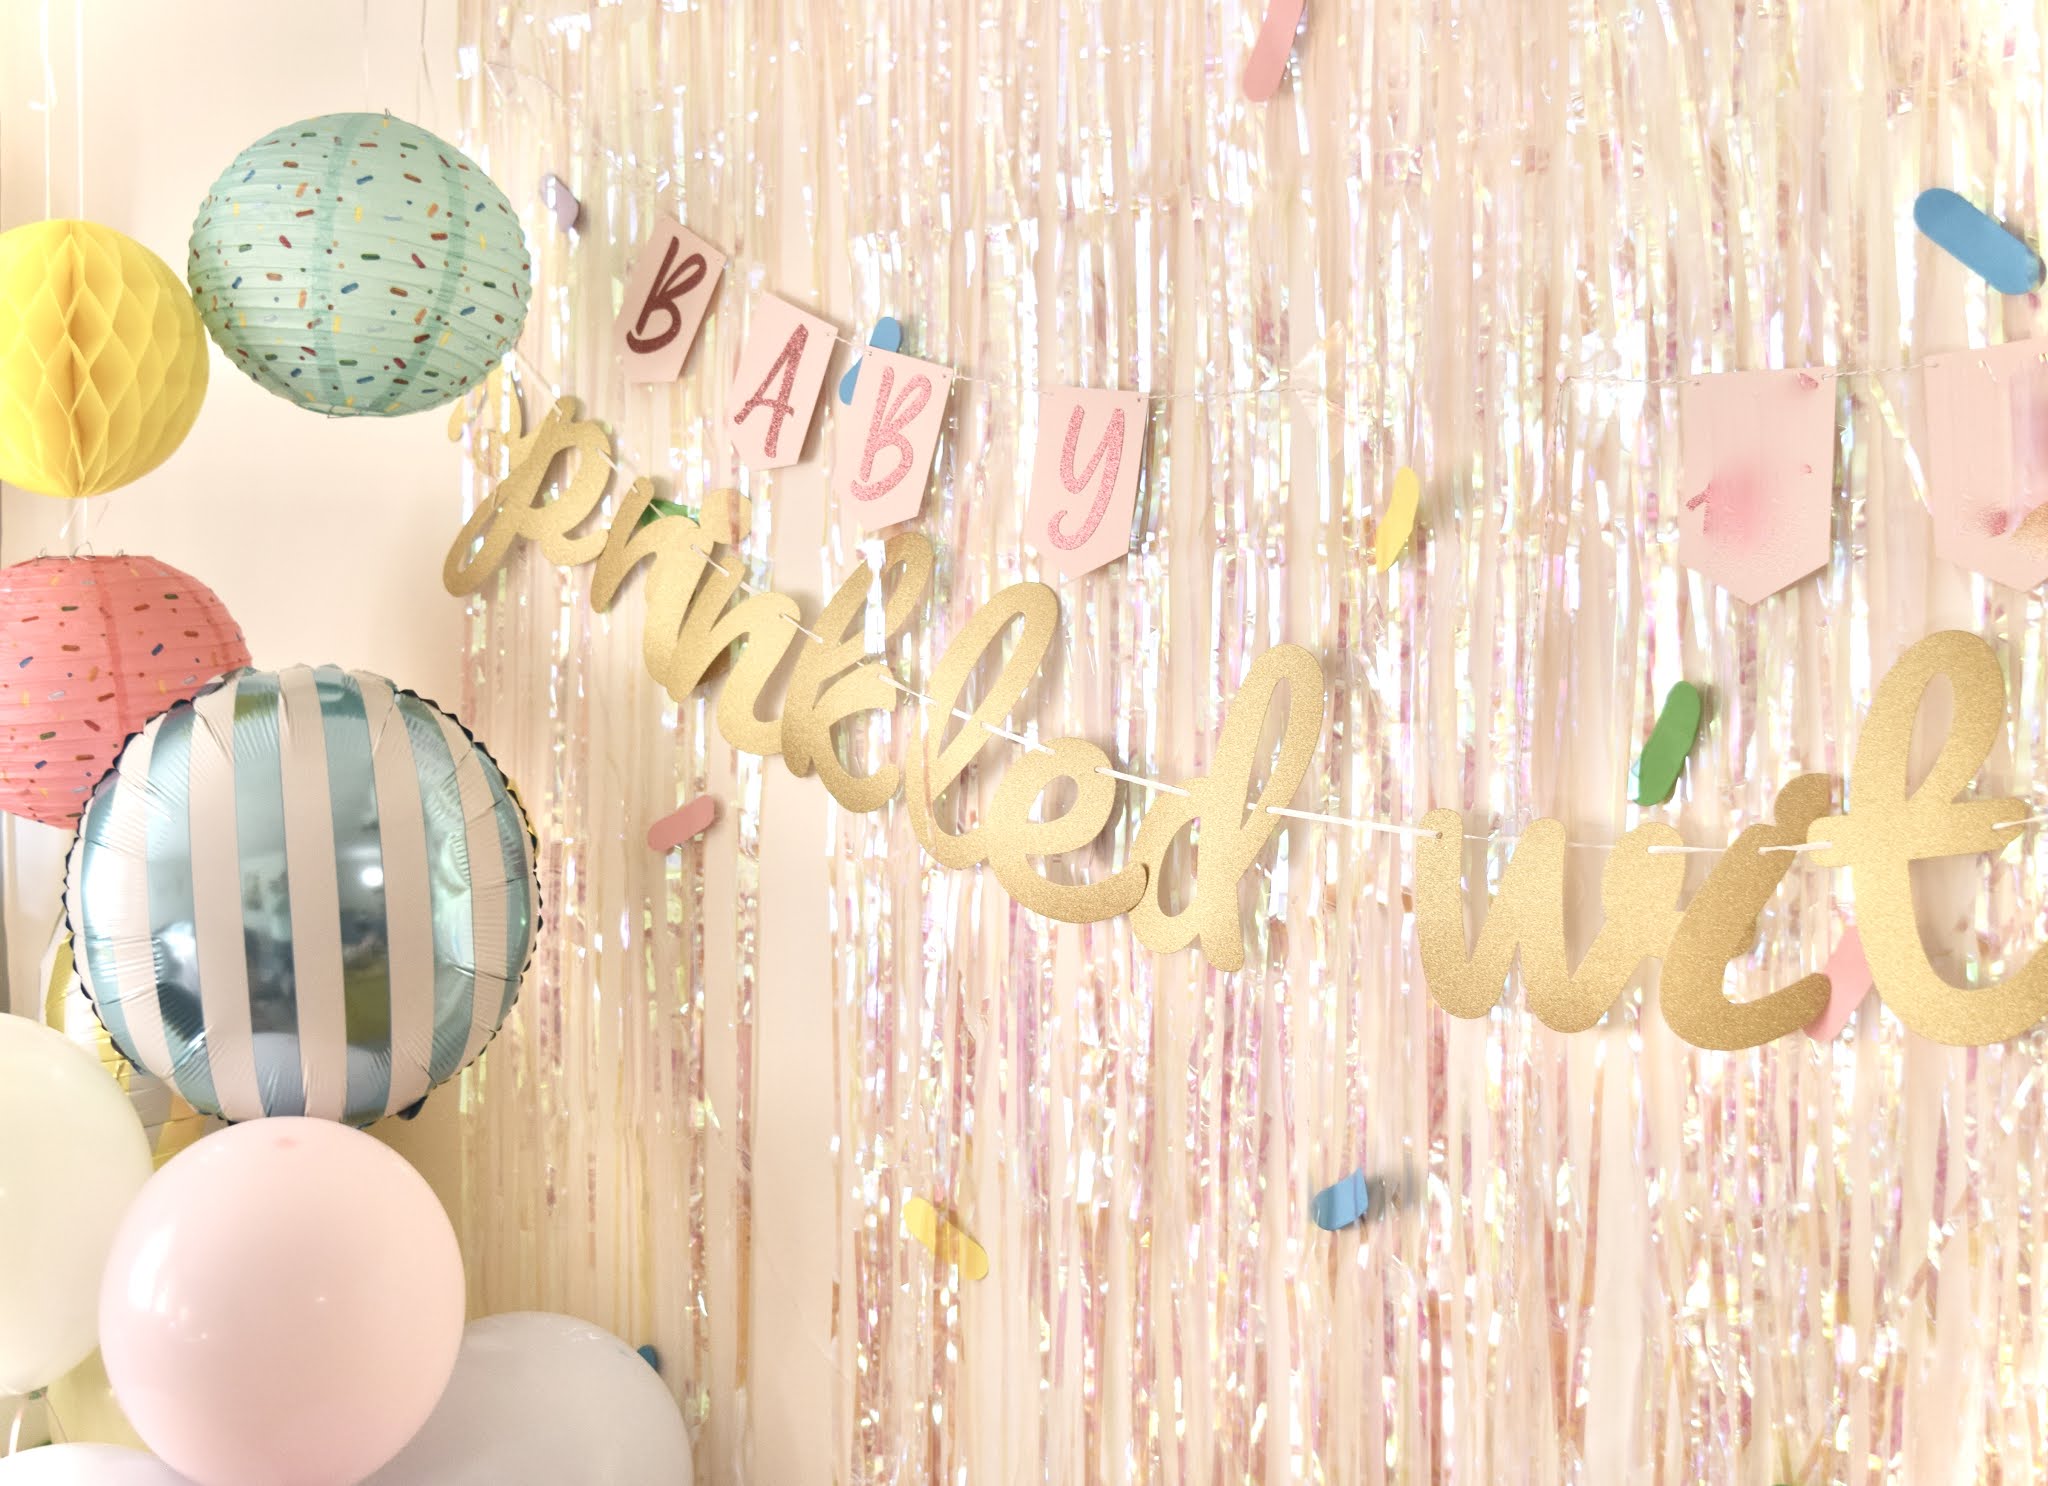
A large part of the decor came from a donut themed decor pack, which was very convenient. It included the balloons, wall sprinkles, "sprinkled with love" banner, decorative hanging spheres and lanterns, and donut cut outs while I used to decorate the table. It also included some mylar donut-shaped balloons which I sadly forgot about. The metallic foil curtains were purchased separately and added more dimension to the backdrop (plus, I'm a sucker for foil curtains). The custom pink "baby ____" banner was purchased from Etsy and featured the baby's last name (the couple is keeping the first name a surprise!). The baby shower bear balloon was a last minute pick-up I got from Party City while out inflating the other balloons. 


Feeding a crowd and menu-planning is another thing you don't have to worry about with a virtual baby shower. We had donuts from Kane's Donuts to keep with the donut theme. The donut toppers were special touches for the treats at the shower. After the shower, we ordered in Carmelina's for dinner. 


We ended up playing three games. For the first, named Glazed and Confused, we had collected 4-5 childhood anecdotes and memories of each of the parents-to-be from family beforehand. We then shared the anecdotes while guests guessed whose memory it was. It was a funny way for family to reminisce on when the parents-to-be were kids themselves and for guests to hear the stories.


For the second game, named Whoa Baby, guests were presented with a Powerpoint through the screenshare function on Zoom. Each slide featured a movie or song that included the word "baby" and guests had to fill in the blanks (for example, "Baby" by Justin ______). Answers were only counted if entered through the chat and with the correct spelling. This way, you didn't have chaos with everyone yelling at the same time and a running record of who said the right answer first. For the last game, we played the traditional game of guessing the mother-to-be's belly size. Guests entered their guesses in the chat and we confirmed with a measuring tape.

After the shower and before dinner, we took advantage of the wonderful weather and afternoon glow and took photos outside (with a few photos of the parents-to-be wearing masks, of course).

sprinkled with love: a virtual baby shower

Wednesday, October 14, 2020


This early September was a big birthday for my dad, so my siblings and I really wanted it to be special. My dad doesn't particularly enjoy large parties, so throwing a huge bash was out of the question. Still, we wanted some of his closest friends to be there. The three of us organized an intimate surprise birthday dinner party for him at my parents' house in Houston. Planning a party for ~50 guests (yes, that's our definition of intimate) all the way from Dallas was difficult, and keeping it a surprise all the way up to the big day was almost impossible. Between finalizing with catering (oh, hello accidentally-ordering-from-the-wrong-restaurant-and-realizing-it-two-days-before-the-party), to getting my dad out of the house for a few hours as guests arrive (oh, hello sneaky-snooping-dad-who-figured-out-what-was-going-on), it was a hefty task that ultimately turned out to be pretty special. 
This post focuses on some of the decor my sister and I did for the party, complete with links to the party supplies. 


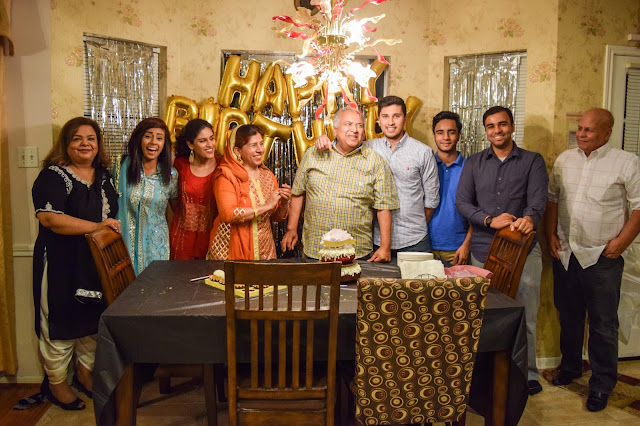
We kept the color scheme black, silver, and gold. My dad is a pretty low-key guy, so going any more extravagant than what we did would surely have resulted in a lecture after the party about how we shouldn't be spending so much money on him (seriously, he never lets us spoil him). Not pictured are black, gold, and silver helium balloons that we put up around the house. The gold foil "happy birthday" balloons were the highlight of the decor in the kitchen area, and served as the backdrop for pictures. The contrasting silver foil curtains added something extra to cover the blinds. Black plastic table covers with gold star-shaped confetti wrapped up the main location in the kitchen.


Silver foil curtains: I ordered a pack of these (came with two curtains which was enough to cover the area in the picture), and they did not disappoint. Easy to hang up, didn't tangle or rip, and came with an adhesive strip at the top so I didn't have to use very much of my own tape. 

Gold foil "Happy Birthday" balloons: These balloons were fantastic for the price. There is some assembly acquired- you have to blow up the balloons yourself. The pack comes with a straw and stickers to tape the inflating holes shut. I was able to blow all of the letters myself, no balloon pump needed. The pack recommends not using helium because the balloons don't float either way, and helium may risk bursting them. I taped them all together and then to a strong thread to keep them hanging on the walls. Bonus- the pack comes with a few multicolor star shaped balloons. They stayed inflated all night and well into the next day!


Nothing Bundt Cakes: We went with a tiered bundt cake. Red velvet on top, and carrot on bottom. We also ordered pecan "bundtinis" (dad's favorite flavor), as back up in case we ran out of cake. All of the flavors tasted amazing.

Gold star-shaped confetti: Just your standard, star-shaped confetti. Not much else to say about this. I'd give it 5 stars. Or 150. Hehehe. Get it? 


Gold party fans: These fans came with string attached and adhesive which made assembly a 30-second process. The only thing about them that I wish I knew before purchasing, was that they unfortunately aren't double-sided. If that's something that bothers you, these could easily be hung/taped onto a wall and used as a back drop. 


Lastly, I made this tassel garland in the car on our drive to Houston! I got the thread from Target for $1 and bought the tissue papers from Hobby Lobby and Target. To see how I made it, check out my DIY Tassel Garland tutorial here

dad's surprise birthday party decor

Friday, September 30, 2016

Part two of the mayoon decorations will be all about the backdrop for where I was sitting, and how we constructed it!


I wanted something with fabric hanging in the backdrop similar to the engagement decorations, but the challenge was finding something to hang the fabric from. For the engagement, the fireplace mantel served that purpose. For the mayoon, I decided to create something with two poles placed vertically on the side and a horizontal pole placed on top. The top pole would be something from which I could hang the fabric, and the side poles would provide support and stability. Fittingly, my engineer dad and architect stepmom gave me this idea.

Instead of making a trip out to buy some PVC pipes, I found some large bamboo plant stakes in my garage that seemed perfect for the job. Because they were bamboo, they weren't perfectly straight, but the fabric covered the imperfections. I used heavy duty masking tape to tape the poles together to create a pi-shaped (Ï€) frame. To save my newly constructed frame from toppling over, I used masking tape to tape the lower parts of the side poles to my TV stand. Before adding the fabric to the frame, I basically had two bamboo poles taped to both sides of the TV stand, with a horizontal bamboo pole on top. The TV was of course on the TV stand, but it didn't matter because the fabric would soon be covering it.


Next was hanging the fabric. I bought 2 cuts of shiny green fabric and taped the fabric over the horizontal pole on the top. This was pretty simple and having the green (versus a lighter color like gold or silver) hid the shadow of the TV from underneath the fabric. I had leftover gold fabric from the engagement decor, which I attached with masking tape to the top of the curtains (behind the frame/backdrop). This way, it hid some of the curtains in the back and added another layer of decor.

Adding the rest of the touches was easy. I added some red tulle to the ends and hung a longer piece of it down the middle, and added some petal garland pieces to the end. I added a flower garland with yellow flowers to provide some contrast against the green, and to disguise the slight crookedness of the bamboo. 

And that was it!


Here's an action shot from later that night with my sister, me, and my friend Saleha:

mayoon part 2: constructing a backdrop

Tuesday, May 17, 2016


After a long hiatus (during which I found out where I'm going for residency for the next 4 years and got married all within a week), I'm back and well-rested, finally!

This post features the decorations me & my sister did for my mayoon. In case you don't know what a mayoon is, here is a great explanation. If you don't feel like reading the explanation, then it's basically this: a girl's party consisting of music + dancing + singing + food. Although decorating for it was a huge project, we started weeks in advance of the event so it wouldn't completely exhaust us. Then again, that only gave me more time to go really hardcore with the decor- I just couldn't help it. Since it's so much, I will be dividing this event into two posts. This post will feature the tulle + flower petals, and the next post will talk about how we built the "stage"/backdrop behind the bench. So without further ado, let's get into it!


The doll is a souvenir my parents got from a trip to Pakistan years ago. I thought she would make for a cute greeter to the party! At the front door was a cart with the doll, chocolate, a floral S that I made (with the instructions here), and baby khussay (shoes).


The color scheme is usually vivid and bright colors with mostly green and yellow.
Just like tulle was a huge theme for my engagement decor, we introduce green tulle, with yellow and red, for this event. I originally wanted a tent-like draping of the tulle for my engagement decor, but we opted for draping along the wall. So for this event, I seized my chance and went for the tent look. We got about 40 yards of yellow tulle and 40 yards of green tulle (with a 50% off coupon, this comes out to about $17 for the yellow and green tulle, respectively!). We grabbed pushpins and a ladder, and began doing back and forth between the outer edge of the room's ceiling and the center of the room right about the light fixture. We alternated between yellow and green for a more fun look.


 Lastly, my sister had the brilliant idea of adding loose fabric petals on top of the yellow tulle, which contrasted beautifully. I knew creativity ran in the family!


Next was the continuing theme of the rose petal garland. I had some leftovers from the engagement decor, so this was extra that I found space for. We outlined the tulle in the room with the garland to add some red.


The banisters already had yellow tulle and floral garlands from the engagement decor, so we added multicolor Christmas lights. Shout out to the Merrifields for letting us borrow a strand last minute when our lights blew out the day of the event!


Lastly, we added white sheets to the floor for seating/dancing and borrowed pillows and a dhol (drum) from family friends because, I mean, a dhol is kind of important for a mayoon- what's a party without drums?


Of course, a photo from later that night:


I'll be posting part two next!

mayoon part 1: tulle, petals, and lights

Friday, April 15, 2016


The last of the engagement party DIY details are thrown into this post. These were small things I was able to do pretty quickly. The picture above was a decorative tray of fresh rose petals with tealights- the smell was amazing. I placed the tray on a coffee table in the family room area.


The other place I had fresh flowers was the centerpiece on the mantle above the fireplace. While the arrangement was beautiful, the vase/container it came in was an ugly yellow. Thankfully, I had some metallic gold spray paint that changed things significantly. 


We bought this spool of rhinestone ribbon that we used as a border around a large mirror above my fireplace. The ribbon was on sale at Hobby Lobby ($5 for 15 feet). We used masking tape to hold up the ends.


Lastly, we used the remaining gold tulle to wrap around the banisters. We then used straight pins to secure rose garlands onto the tulle. It added a nice look in the entryway when guests first walked into our home.

other small DIY details

Saturday, November 21, 2015

Part two of the house decorations for my engagement party involved a lot of tulle. The great thing about tulle is how cheap it is for the amount you can get (less than $2/yard). And if done right, it can look pretty awesome. We stuck to gold and red tulle and bought about 40 yards of each color. We hung it around the family room with red bows in between each wave of gold tulle. Hanging it up around the room really filled up the room. We had some leftovers which we ended up wrapping around the banisters. 


The individual bows themselves were three loops of fabric tied up with pipe cleaners that were fluffed up. We first hung up the gold tulle and then added the bows on top.


The hardest part was probably putting it all up. We had to move around all the surrounding furniture and bring in a ladder. However, I think the end product was totally worth it.

I'll be posting a part three of other tiny DIYs from the event soon!

tulle

Sunday, November 15, 2015

Instagram