Instagram


When you're still getting your feet wet in the kitchen (sometimes accidentally literally), anything that turns out edible is a win. My personal favorite edible-but-tasteless dish when I was learning how to cook in college was pasta + tomato sauce with a side of salad. I remember when even the idea of boiling pasta seemed like a big deal (what is al dente and how is that different than just cooked pasta?!). Then there was my eggs-for-dinner phase that spanned more weeks than I'm proud to admit. Needless to say I like to think those days are behind me, although I do feel like learning to make Pakistani dishes is like learning to cook all over again. But more on that later.


These peppermint chocolate truffles that I first saw on Cupcakes & Cashmere as a guest post by What's Gaby Cooking immediately caught my attention. Although hesitant about making a batch of 24+ truffles because H and I had just talked about eating healthier less than 24 hours ago, I decided to make them for my co-interns at our didactics lectures, and save a couple for H and I at home. These "truffles" or more appropriately "oreo balls" are ridiculously easy to make and require no baking. Just blend, roll into a ball, dip in chocolate, and refrigerate. They're the perfect treat to make if you're just getting into cooking, perfect for holiday parties, and perfect for if you want minimal effort + maximal deliciousness. 


Ingredients:
- 1 package of Double Stuf Oreos 
- 1 8 oz package of cream cheese (original recipe calls for room temperature, I used it cold)
- 1 11.5 oz bag of Nestle milk chocolate chips 
- 1/4 cup of crushed candy canes for topping (I used about 15 mini candy canes) or crushed peppermint candy
Yield: ~30 balls, depending on size

Instructions:
1. Add the entire package of Oreos to a blender/food processor and blend until no large chunks of cookie remain. I blended it to a pretty fine mix instead of pulsing. 
2. Add the entire packet of cream cheese to the blender/food processor with the Oreo mix and blend further until well-mixed. The original recipe called for room temperature, but a mix of impatience + being mildly afraid of letting a dairy product get to room temperature made me just stick the cream cheese in cold.
3. After blending the Oreos and cream cheese together, refrigerate the mix for about 30 minutes. This made the mix less sticky and more firm, which in turn made it easier to roll into a ball. The balls held their shapes better and it was a lot easier to dip them into chocolate.
4. While the mix is chilling in the fridge, prepare your melted chocolate.
5. Either in a blender/food processor or with a rolling pin, crush your candy canes.
6. Roll the mix into balls in the size of your liking and place on a baking pan lined with parchment paper. The smaller the balls, the more you will get quantity-wise.
7. Dip the Oreo balls into your melted chocolate and place back on the parchment paper
8. As you dip each ball and place it back on the paper, sprinkle some crushed candy cane on top. If you wait until your done dipping all of the balls, the chocolate will harden and your candy cane mix won't stick!

Serve immediately or refrigerate.

no-bake peppermint chocolate truffles

Thursday, December 15, 2016


I can't remember where the inspiration for this piece came from, but I knew I wanted to depict a misplaced animal in the midst of loud and busy Times Square in New York City. I intended for the piece to be full of juxtapositions- the giraffe out of it's element and running through NYC, as well as the detailed background + relatively simple giraffe almost-silhouette. I kept the giraffe simple to keep the focus on the background. Depicting the noise, traffic, and vibrant colors and lights of Times Square further intensified the chaos surrounding the animal. Leaving the animal undetailed and with no face almost makes it seem non-existent and engulfed by the city. 


Although at the time I created this piece my living situation was very much not analogous to this giraffe's plight (I was peacefully living with my parents in the suburbs), I think it still captures an anxious and overwhelming feeling we can all relate to. The first day of college, our first jobs, our first major failures and setbacks. We feel singled out, odd, alone, and different (in a bad way). Atleast that's how I imagine someone would interpret this piece. I mainly just wanted to take on the challenge of sketching out the heavy detail of the background with colored pencils.
The acrylic paint was added on after mounting the work (that was on cheap black construction paper!) onto sturdier, heavier cardstock. I didn't like the idea of leaving the side blank, and the blurry, messy acrylic paint only further adds to the organized chaos that is NYC.

giraffe in the city

Thursday, December 8, 2016


One of my favorite stories to tell is how H & I ended up moving to Dallas. Looking back, it's a comical story, but in the moment it was insanely stressful. For a long time, my plan had been to stay in Houston after medical school and complete my residency training there. My family is in Houston, I went to medical school there, and I really liked my home residency training program. H and I had gotten engaged in the middle of my residency interviews but we both had pretty similar views on where we would be okay with living. I say "okay with living" because of the way residency match works- you rank all of the places you interview at in a list and submit it about 1.5 months before Match Day. Match Day is the day fourth year allopathic (MD) medical students across the country find out where they're  going to be doing their residency training for the next 3+ years. While I will spare boring readers with the intricacies of Match Day and how the system works (If you're really interested you can read about the Nobel Prize winning algorithm here), basically you rank programs and programs rank you. If it's a good match, that's where you end up! So if I rank a program #1, and they rank me like #100, there's a significantly less chance I would end up there. What I'm trying to convey with this explanation is that applicants have little control over where they end up (cue stress). 

Fast forward to the end of interview season in late 2015, when I told H that I really liked the program in Dallas and was thinking to rank it highly on my list. In a strange twist of events, H ended up with a job in Dallas before I found out where I was going for residency, and now the tables had turned- I had to basically get a residency spot in Dallas or we wouldn't be living together for the next few years after our wedding. To add the cherry on top of an already stressful process, can you guess when our wedding date was? Exactly one week after Match Day. I remember minutes before I lined up to run to the board and grab my results (yes, the individual results are folded and stapled on a giant board that we all stampede to when it's time), my dad decided to make a really funny comment to H- "Hope you guys end up in the same city". Exactly what I needed to hear minutes before match results. Needless to say, it all worked out, alhamdulilah (thank God), and we could all breathe a little easier after my trembling hands ripped open my paper and I screamed "I GOT DALLAS!". I texted my (future) in-laws right away, who sent their congrats, and H and I were off to get our marriage license, relieved to have atleast one life changing event out of our way.

When H got his job in Dallas, he had two weeks to find a place to live, move in, and be ready for work. Since we still had no idea where I would end up for residency when he moved, we had to hope for the best and H very thoughtfully found a place close to the medical center where I would theoretically be working. The only drawback, as I found out after seeing the place in person post-wedding, was that it was a little smaller than I was used to. Having always had a 2-bedroom apartment with a roommate, a 1-bedroom was quite the adjustment. I remember annoyingly lamenting to H how small the closet was (I had to drastically cut down on the amount of clothes I had, which was probably ultimately a good thing). Barring my initial troubles with the space adjustment, the place has come to feel cozy and like home. I learned to use space very pragmatically and it definitely curbed my habit of buying useless things because we just did not have the space for it! I gathered some of my favorite space-saving tips to post here. Whether you find yourself living in a smaller space, or just want to save space, I hope you find these tips useful!

1. Over-the-door hooks: I've used these almost everywhere I've lived. They're useful for hanging things I use on a day to day basis, like jackets, handbags, and my white coat. We currently have 3 of these in our apartment and I wish we could have more. Seriously, they're awesome. I got mine from Walmart and Target.


2. Storage Ottoman: This neutral, dual-function ottoman has been a great place for me to put shoes that I don't regularly use, like heels and party shoes. It took about 2 minutes to assemble, can hold a lot, and was only $30 on Amazon. Getting rid of the excessive amount of clothes I had was way easier than parting with shoes, so I had to find a place to keep them. Get the ottoman here.


3. Over-the-door shoe holder: Part two of over-the-door things is this shoe container I picked up from Walmart. It hangs on the inside of our laundry doors and is a great place for me to keep the shoes I do wear on a regular basis. This was also a staple I've used in many places I've lived. It's easier than using shoe boxes because I can actually see the shoes I have, and it drastically cuts down on space.


4. Rotating tie rack: Labelled as a tie rack, this nifty twirling rack with 20 prongs can be used to hold really any type of lightweight clothing item. Since it came in a pack of 2, I used one to organize H's ties, and one for my camis and undershirts. It frees up hanging space in your closet, allows me to quickly find camis that I wear daily, and I no longer have the problem of H's ties slipping off their hangers and falling onto our closet floor. Best of all, it rotates. Get a 2-pack for $7 from Amazon here.


5. Industrial storage coffee table: Between this coffee table and our red-orange couch, I can't decide what I would label as the stand-out piece in our living room. H and I saw this coffee table when walking around West Elm one day as we were waiting for a table at a sushi place next door, and instantly decided we would use some of our wedding money to splurge on it. We were both attracted to the minimalist look, and I got (too) excited about the immense storage space within. The extending portion is great for doing work on the couch or eating. It's my favorite furniture piece we own, and is always a hit with guests. Get the coffee table here, or find less expensive alternatives here and here.


storage tips for living in a smaller space

Friday, November 18, 2016


When does pumpkin spice season start? Does it start October 1st or when fall weather first makes an appearance? I guess that depends on where you live. If I waited for fall weather in Texas, I would probably be waiting until the end of November, and if I was specifically in Houston, I would be waiting until December. However, there was a brief period of fall weather in early October here in Dallas that was just perfect for making these pumpkin banana chocolate chip muffins. They turned out incredibly moist and had the perfect amount of pumpkin flavor cut by the banana- not overwhelmingly in your face, but enough to be noticed. I took it once step further by mixing my own pumpkin spice mix, which, surprise, has absolutely no pumpkin in it. It's an aromatic and cozy blend of cinnamon, nutmeg, ginger, and cloves perfect for the fall weather. Best of all, it's incredibly easy to blend together and doesn't leave you wondering why your pumpkin spice latte is orange if there isn't actually any pumpkin in it.


4-ingredient pumpkin spice mix from allrecipes:
-1 tsp ground cinnamon
-1/4 teaspoon ground nutmeg
-1/4 teaspoon ground ginger
-1/8 teaspoon ground cloves (I replaced this with an equivalent amount of allspice)

Blend together and you're done!


pumpkin banana chocolate chip muffins, adapted from eat-drink-love.com
-1 cup pumpkin puree (I used 1 1/4 cups for a more pumpkin taste)
-1/2 cup vegetable oil
-1 cup mashed ripe bananas (I used 3 medium sized bananas)
-1 tsp vanilla extract
-1 large egg, beaten
-1/2 cup brown sugar
-1 1/2 cup all purpose flour
-1/2 tsp baking soda
-1 tsp baking powder
-1/4 tsp salt
-1/3 cup chocolate chips
-1 tsp ground cinnamon* 
-1/4 teaspoon ground nutmeg* 
-1/4 teaspoon ground ginger* 
-1/8 teaspoon ground cloves (I replaced this with an equivalent amount of allspice)*

*- taken from the pumpkin spice recipe listed above.

1. Preheat oven to 375 degrees F and spray baking cups with non-stick spray.
2. In a large bowl, mix pumpkin + vegetable oil + mashed bananas + vanilla + beaten egg + brown sugar + chocolate chips
3. In another large bowl, mix flour + baking soda + baking powder + salt + pumpkin spice
4. Combine ingredients from the two bowls and mix until just combined
5. Fill baking cups almost to the top with batter and bake for 25 mins or until a toothpick inserted comes out clean

pumpkin banana chocolate chip muffins

Monday, November 7, 2016


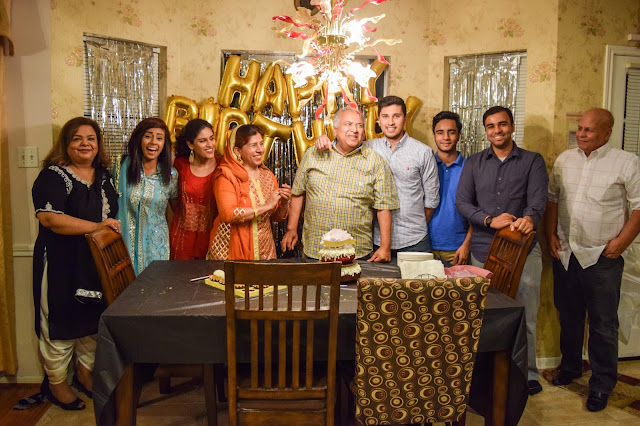
This early September was a big birthday for my dad, so my siblings and I really wanted it to be special. My dad doesn't particularly enjoy large parties, so throwing a huge bash was out of the question. Still, we wanted some of his closest friends to be there. The three of us organized an intimate surprise birthday dinner party for him at my parents' house in Houston. Planning a party for ~50 guests (yes, that's our definition of intimate) all the way from Dallas was difficult, and keeping it a surprise all the way up to the big day was almost impossible. Between finalizing with catering (oh, hello accidentally-ordering-from-the-wrong-restaurant-and-realizing-it-two-days-before-the-party), to getting my dad out of the house for a few hours as guests arrive (oh, hello sneaky-snooping-dad-who-figured-out-what-was-going-on), it was a hefty task that ultimately turned out to be pretty special. 
This post focuses on some of the decor my sister and I did for the party, complete with links to the party supplies. 


We kept the color scheme black, silver, and gold. My dad is a pretty low-key guy, so going any more extravagant than what we did would surely have resulted in a lecture after the party about how we shouldn't be spending so much money on him (seriously, he never lets us spoil him). Not pictured are black, gold, and silver helium balloons that we put up around the house. The gold foil "happy birthday" balloons were the highlight of the decor in the kitchen area, and served as the backdrop for pictures. The contrasting silver foil curtains added something extra to cover the blinds. Black plastic table covers with gold star-shaped confetti wrapped up the main location in the kitchen.


Silver foil curtains: I ordered a pack of these (came with two curtains which was enough to cover the area in the picture), and they did not disappoint. Easy to hang up, didn't tangle or rip, and came with an adhesive strip at the top so I didn't have to use very much of my own tape. 

Gold foil "Happy Birthday" balloons: These balloons were fantastic for the price. There is some assembly acquired- you have to blow up the balloons yourself. The pack comes with a straw and stickers to tape the inflating holes shut. I was able to blow all of the letters myself, no balloon pump needed. The pack recommends not using helium because the balloons don't float either way, and helium may risk bursting them. I taped them all together and then to a strong thread to keep them hanging on the walls. Bonus- the pack comes with a few multicolor star shaped balloons. They stayed inflated all night and well into the next day!


Nothing Bundt Cakes: We went with a tiered bundt cake. Red velvet on top, and carrot on bottom. We also ordered pecan "bundtinis" (dad's favorite flavor), as back up in case we ran out of cake. All of the flavors tasted amazing.

Gold star-shaped confetti: Just your standard, star-shaped confetti. Not much else to say about this. I'd give it 5 stars. Or 150. Hehehe. Get it? 


Gold party fans: These fans came with string attached and adhesive which made assembly a 30-second process. The only thing about them that I wish I knew before purchasing, was that they unfortunately aren't double-sided. If that's something that bothers you, these could easily be hung/taped onto a wall and used as a back drop. 


Lastly, I made this tassel garland in the car on our drive to Houston! I got the thread from Target for $1 and bought the tissue papers from Hobby Lobby and Target. To see how I made it, check out my DIY Tassel Garland tutorial here

dad's surprise birthday party decor

Friday, September 30, 2016


Back to the topic of over-zealously hand-making every thank you card for the wedding. These pun thank you cards were a lot easier to make than the calligraphy cards (see previous post). While I googled most of the puns, I did have fun coming up with the drawings. I bought the cards + envelopes from Paper Source and used my watercolors and Micron black pens. I've posted some of my favorites here!


(This pun I can take credit for)


DIY pun thank you cards

Saturday, September 24, 2016


I really wish I had come up with a better idea than over-zealously deciding to hand-make every single thank you card from our wedding. I figured "hey, I still have a few months before I start working, why not?". Silly, naive me. While I did have more free time, I didn't realize just how exhausting it would be making 100+ cards. I eventually gave up and bought some punny store cards for the last few cards. If I could do it again, I would probably draw out a few designs and get them printed.

DIY calligraphy thank you cards

Friday, September 9, 2016


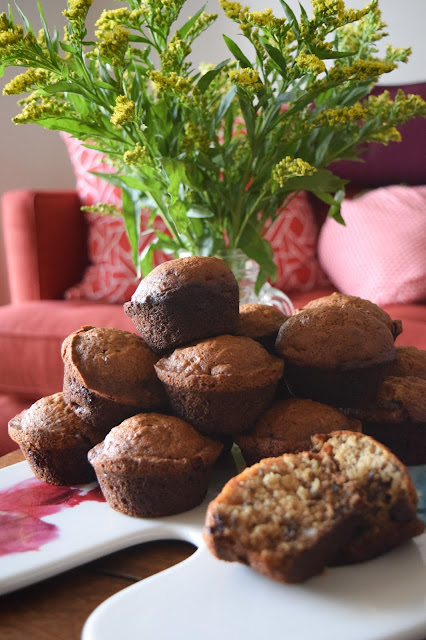
I love bananas, I love chocolate, and I love the idea of something quick and relatively healthy in the mornings (healthier than skipping breakfast atleast). With work beckoning at really early hours some months, I need something easy to eat that will keep me full until lunch or the next time I get a chance to eat. I made these banana nut chocolate chip muffins a few weeks ago and took some into work for my team. They were a hit and I can't wait to make them again! The recipe is similar to my banana bread recipe I've posted about before, but these include a few additional ingredients.

Recipe take from food.com (click for link).
 
Ingredients:
3 medium very ripe bananas
1 egg
13 cup low-fat buttermilk or 13 cup milk
12 cup granulated sugar
12 cup brown sugar
1 12 cups flour
1 teaspoon baking soda
1 teaspoon salt
2 -3 tablespoons chocolate chips
2 tablespoons chopped walnuts (optional)
 
Directions:
Preheat oven to 350 degrees.
Lightly coat 12 muffin tin liners with cooking spray and place in muffin tin.
In large bowl, mash bananas with fork.
Whisk in egg, milk, granulated sugar, and brown sugar.
In separate bowl, combine flour, baking soda, and salt.
Add flour mixture to banana mixture and combine well.
Fold in chocolate chips and walnuts.
Spoon equal amounts of batter into 12 muffin cups.
Bake 20 minutes or until toothpick inserted in center comes out clean.
Allow to cool slightly in pan, then remove to wire rack.


banana nut chocolate chip muffins

Wednesday, August 31, 2016


This is a birthday card I made for my cousin a while back, before I got slammed with residency. The hours have been rough (hi 16 hour shifts), the weeks have been long (hi working 13 days straight), but I'm alive! Although I thoroughly anticipated posting less once I began working, I still intend to post as much as I can. Blogging and DIYing/crafting/cooking serves as a huge way for me to relieve stress and use the other side of my brain, and it is just as important to take care of yourself mentally as it is physically!

 Back to the card- I wanted something simple but still wanted to incorporate calligraphy. I was inspired by Paper Source's summer catalog and the bright colored leaves, so I painted my own with acrylic paint. 


The stationary I used was a pack of 50 cards + colored envelopes I picked up from Target for $10. When I got them, I thought they were greeting cards that would fold open. I was a little disappointed when I saw they were just slips of paper, but they eventually grew on me. They're the perfect size to leave a short and sweet message- sometimes less words say more!


birthday card

Friday, August 5, 2016


One of my really close friends recently got engaged and had a dinner at her house with her family, close friends, and in-laws-to-be. The day before, we acted on a spur of the moment idea and went to Hobby Lobby to find materials for DIYing décor for the dinner. Not really having an idea of what either of us was looking for ended up being awesome because we just went with whatever we could think of as we perused the store. Although I didn't end up getting pictures of all of the decor, I did capture one piece we both worked on that was so easy to create.


This DIY tassel garland is so simple to make and is a great way to fill an empty space for any occasion- a birthday, a house party, a dinner, anything! All you need are scissors, gift tissue paper, string, and tape. You get to pick your own colors, string, and decide how closely you want to bunch the tissue paper together. The instructions are uncomplicated, and the result looks like you spent a lot of time on it. I've seen these types of tassel garlands being sold ready made at stores, but why pay more for a premade option when you can customize & DIY one in your free time for a lot cheaper!


Pro tip- we learned it is much easier to handle regular tissue paper than mylar paper. The mylar was difficult to cut evenly and sometimes just ripped. Although, the shiny mylar tassel is, in my opinion, really cute and worth the hassle (hehe).

Get the instructions from HGTV here


DIY tassel garland

Friday, July 15, 2016


With the free time I had before residency began, I really wanted to put a lot of time into my hobby of card-making and practice my calligraphy. This meant finding any and every excuse to make a card (many more posts on that to come soon) instead of getting store-bought ones. Although there is no lack of creative and cute cards out there (ahem Paper Source), I love making cards when I have time. Making cards for my two dads this Father's Day was no exception this handmade card bender, and I used my favorite combination: watercolors & calligraphy.


I will admit the pun was a stretch.

punny father's day cards

Sunday, July 3, 2016

Instagram